Lecture 5
Networking
- Today we’ll transition from building command-line programs in C to web applications, and though we’ll see new languages, many ideas and concepts will stay the same.
- TCP/IP (Transmission Control Protocol and Internet Protocol) are two protocols, or rules that specify how computers can communicate with each other. The modern internet relies on these protocols to work.
- We might have sent handwritten letters in the mail in the past. On the outside of the envelope, we need to write an address, including information like a name, street, and city. We also write our own name and address as the return address.
- Each address, too, should uniquely identify a building or place.
- Our computers also have addresses that uniquely identify them on the internet, called IP addresses. In IPv4, or version 4 of the protocol, these addresses are numbers in the format
#.#.#.#, four numbers between 0 and 255 separated by dots. And to represent each number (with 256 possible values), we need exactly 8 bits, and so each IP address is made of 32 bits. But with 32 bits, we can only represent 4 billion values. And since there are more than 4 billion devices connected to the internet, we have a newer version of the protocol, IPv6, which has 128-bit addresses, that the world is starting to transition to. - A server, which is just a computer connected to the internet that can listen for and respond to messages, might provide many services, such as a web site or email. To specify that a message is intended for a particular service, such as web browsing, another number called the port number is added to the address. For example, HTTP, for browsing websites, is usually communicated with port 80. So an envelope with a message might have
1.2.3.4:80as the destination address, and5.6.7.8as the return address. And there are other complexities, but that’s the basics of how computers can communicate over a network. - Let’s say we wanted to visit a URL, Uniform Resource Locator, like
http://www.example.com/. It turns out that there’s another technology called DNS, Domain Name System, that many internet providers and organizations maintain, which converts domain names (likeexample.com) into IP addresses.- There are actually now hundreds of TLDs, top-level domains in addition to
.com, such as.net,.org,.us,.uk, and more. - The
wwwin front of a domain name is actually a subdomain, and there might be many of them created, each of which pointing to a different server or set of servers. It’s not required, andwwwis only used by convention. For example, MIT usesweb.mit.edufor their main website’s address. - The
/at the end implies that we’re asking for the root page of the site, which is conventionallyindex.html, where.htmlindicates that the file is written in HTML, a language we’ll soon look at.
- There are actually now hundreds of TLDs, top-level domains in addition to
- When we type that URL in a browser, our browser first uses DNS to look up the IP address for that domain, and then sends a request (in a virtual envelope) to the right IP address for the website. And when the server at that address responds, it will send us the content of the website in a virtual envelope with our address as the destination.
HTTP
- HTTP, Hypertext Transfer Protocol, is another set of rules and conventions for communicating. For example, humans might have the convention of shaking hands when meeting for the first (or subsequent) times. When our browser communicates to web servers through HTTP, too, both computers follow a protocol for making requests and responses.
- A request for a webpage will look like this:
GET / HTTP/1.1 Host: www.example.com ...GETis an HTTP verb that indicates we want to fetch some resource. The/indicates we’re looking for the default page, andHTTP/1.1indicates the version of HTTP our browser is using.- Then,
Host: www.example.comis included, since the same server might be listening for and responding to requests for multiple websites. There are also other pieces of information included in the..., to help the server respond to us appropriately.
- The response from the server might look like this:
HTTP/1.1 200 OK Content-Type: text/html ...- First, we get back the version of HTTP,
HTTP/1.1. Then,200is a numeric code that meansOK, that the server was able to understand and respond to the request. Content-Type: text/htmlindicates that the content of the response is in the language called HTML, in text format.
- First, we get back the version of HTTP,
- We can open a browser like Chrome, and open the Developer Tools with View > Developer > Developer Tools. A panel will open:
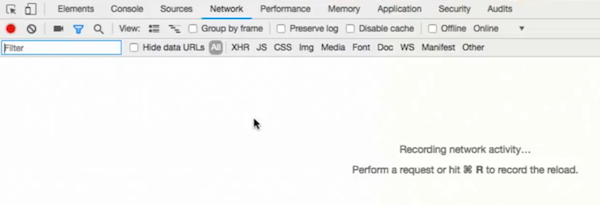
- We can click the Network tab, and if we type
harvard.eduinto the address bar and press enter, a lot will happen very quickly. We can scroll to the very top, click the first request forharvard.edu, and see in the right panel, under “Request Headers”, that the browser indeed sends a request that starts with what we expected:
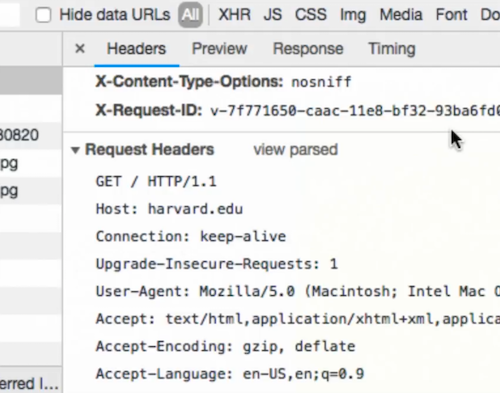
- We can click the Network tab, and if we type
- We can scroll in the same panel and see that the response headers are slightly different:
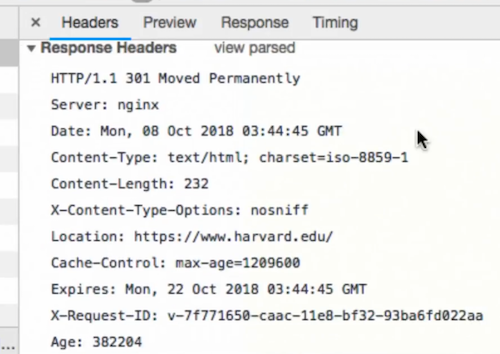
- The response code,
301, seems to say “Moved Permanently”. And if we look down to “Location:”, we see that the new location ishttps://www.harvard.edu. There’s awww, and also a different protocol, HTTPS, which will encrypt our communication more securely.
- The response code,
- Another HTTP code,
404, is “Not Found”, and we get that back if we’re trying to get some URL that the server can’t find. These are some interesting ones:200 OK301 Moved Permanently302 Found304 Not Modified401 Unauthorized403 Forbidden404 Not Found418 I'm a Teapot500 Internal Server Error...
HTML
- Now that our computers can communicate, we can start thinking about creating the content that websites are comprised of.
- HTML, Hypertext Markup Language, is a standard with which webpages are written. It’s interpreted by browsers from top to bottom, and each line might have some text, image, or styling instructions.
- In our browser, we can click View > Developer > View Source on a website to see the HTML that drives websites:
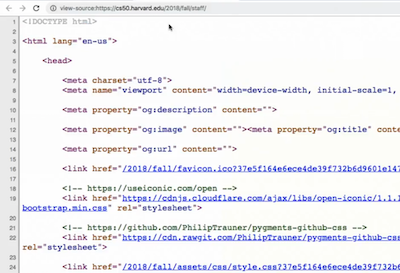
- We can see that this is just text, and the first line,
<!DOCTYPE html>, indicates to browsers that the page is written in HTML. - Then, we see a pattern of lines and indentations, and many tags that start with
<and end with>. First, we have the<html>tag, and nested inside is a<head>tag, which will include information about the webpage, that might not necessarily appear. - Then, we eventually see a
<body>tag, which will have the content of the webpage.
- We can see that this is just text, and the first line,
- We can look at a simple example:
<!DOCTYPE html> <html lang="en"> <head> <title> hello, title </title> </head> <body> hello, body </body> </html>- Inside the
<head>of the webpage, we have a<title>tag that indicates the title of our webpage, “hello, title”. And then, we have a line with</title>, which is a closing tag that indicates the end of the title. - Notice that the indentation and opening and closing tags are symmetric. Like in C, the whitespace is not necessary, but stylistically important.
- The content of this page is just “hello, body”.
- Inside the
- With the text editor in CS50 IDE, we can create and save a file called
index.htmlwith our example code. The CS50 IDE is web-based, and it can run a web server, which is a program that can listen for and respond to web requests. - We can run a server in the terminal, called
http-server, a free and open-source package. If we run that command, we’ll see some information:
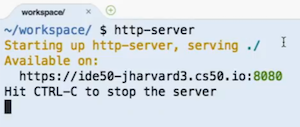
./is the current directory, and in this case we are in our~/workspace/folder.- Then, we see a URL to our IDE’s web server, and since we want to serve these files separately from the IDE itself, the URL ends in
:8080, indicating that we’re using port number 8080. - If we click that link, we’ll see a page that says
Index of /with the files in our workspace. We can click onindex.htmland see our page. We can also change the code in our editor, save, and refresh to see our changes. Since HTML is interpreted by our browser, we don’t need to compile it.
- Let’s take a look at examples of other tags:
<img src="cat.jpg">- Images can be included with the
<img>tag, andsrcis an attribute on the tag that modifies it. In this case, it will specify the source of the image, and the value can be a file or other URL. (In the CS50 IDE, we should upload a file calledcat.jpgin our workspace folder for this to work.) Finally, we don’t close image tags (and other “empty tags”), since there’s nothing else inside the element. - We can also add another attribute tag,
alt, to add alternative text for the image. So our image will look like this:<img alt="photo of cat" src="cat.jpg">
- Images can be included with the
- We can add links with something like
Visit <a href="https://www.harvard.edu/">Harvard</a>.in our body. TheVisitandHarvardpieces are just text, but the<a>tag surroundingHarvardis an anchor tag, which specifies a link with thehrefattribute. In fact, we can phish, or trick, people, into clicking a link to a site that isn’t really what they expect. A bad actor could even copy the HTML of some site, and create a site of their own that appears to be the same. (Though, they won’t have access to the code and data stored on the server.) - We can wrap text with the
<strong>tag to tell browsers to make it bolder. - There’s also the
<p>tag for paragraphs:<!DOCTYPE html> <html lang="en"> <head> <title>paragraphs</title> </head> <body> <p> Lorem ipsum dolor sit amet, consectetur adipiscing elit. Nullam in tincidunt augue. Duis imperdiet, justo ac iaculis rhoncus, erat elit dignissim mi, eu interdum velit sapien nec risus. Praesent ullamcorper nibh at volutpat aliquam. Nam sed aliquam risus. Nulla rutrum nunc augue, in varius lacus commodo in. Ut tincidunt nisi a convallis consequat. Fusce sed pulvinar nulla. </p> <p> Ut tempus rutrum arcu eget condimentum. Morbi elit ipsum, gravida faucibus sodales quis, varius at mi. Suspendisse id viverra lectus. Etiam dignissim interdum felis quis faucibus. Integer et vestibulum eros, non malesuada felis. Pellentesque porttitor eleifend laoreet. Duis sit amet pellentesque nisi. Aenean ligula mauris, volutpat sed luctus in, consectetur id turpis. Phasellus mattis dui ac metus blandit volutpat. Donec lorem arcu, sollicitudin in risus a, imperdiet condimentum augue. Ut at facilisis mauris. Curabitur sagittis augue in dictum gravida. Integer sed sem sed justo tempus ultrices eu non magna. Phasellus semper eros erat, a posuere nisi auctor et. Praesent dignissim orci aliquam laoreet scelerisque. </p> <p> Mauris eget erat arcu. Maecenas ac ante vel ipsum bibendum varius. Nunc tristique nulla eget tincidunt molestie. Morbi sed mauris eu lectus vehicula iaculis ac id lacus. Etiam sit amet magna massa. In pulvinar sapien ac mi ultrices, quis consequat nisl hendrerit. Aliquam pharetra nec sem non vehicula. In et risus leo. Ut tristique ornare nisl et lacinia. </p> </body> </html>- Without the
<p>tags, all of these lines would be displayed together on the page, since HTML ignores whitespace like new lines, and instead combines them to at most one space.
- Without the
- We look at a few more tags from HTML like headings (
<h1>through<h6>indicating the level of heading) and tables (<table>,<tr>for rows,<td>for cells), but through practice and documentation, we can learn to use them fully. Once we understand the pattern of tags and attributes, we can write our own HTML. - We can use tools like the W3C Markup Validator to check that our HTML is valid.
Forms
- On Google, if we search for something, we get redirected to a long URL. It turns out that the URL has our search term in it, and going to a link like
https://www.google.com/search?q=catswill bring us directly to the results page for a search for “cats”.- The page is called
search, and that goes to code on their servers that generates a response for that page dynamically and programmatically. - The
?in the URL adds additional input for the page, andq=catsis telling the server that we are passing in “cats” for the input (search box in this case) with the name “q”, which probably stands for “query”.
- The page is called
- We can write the HTML for a form that takes us to the Google search results for some user input:
<!DOCTYPE html> <html lang="en"> <head> <title>search</title> </head> <body> <form action="https://www.google.com/search" method="get"> <input name="q" type="text"> <input type="submit" value="Search"> </form> </body> </html>- With the
formtag, we can create a form. Theactionattribute tells the browser where the form should go, and themethodattribute indicates how to send the form inputs. - The first
inputtag is a text box, which we will nameqso that it can be sent to Google correctly, and the secondinputtag is a submit button that we’ll label “Search”.
- With the
CSS
- While HTML is used for layout and structure, CSS, Cascading Style Sheets, is another language we can use to style, or change the aesthetics, of our webpages.
- Let’s take a look at
css0.html:<!DOCTYPE html> <html lang="en"> <head> <title>css0</title> </head> <body> <header style="font-size: large; text-align: center;"> John Harvard </header> <main style="font-size: medium; text-align: center;"> Welcome to my home page! </main> <footer style="font-size: small; text-align: center;"> Copyright © John Harvard </footer> </body> </html>- Here, for each of these tags, we’ve added a
styleattribute and some set of key-value pairs as the value that will apply to just those elements. These pairs, likefont-size: large;, are setting CSS properties and can change many aesthetic aspects of elements. - Notice that we have semantic, or meaningful, tags like
<header>,<main>, and<footer>that separates our page into sections.
- Here, for each of these tags, we’ve added a
- Since CSS is inherited by nested elements in HTML, we can factor out the common styles:
<!DOCTYPE html> <html lang="en"> <head> <title>css1</title> </head> <body style="text-align: center;"> <header style="font-size: large;"> John Harvard </header> <main style="font-size: medium;"> Welcome to my home page! </main> <footer style="font-size: small;"> Copyright © John Harvard </footer> </body> </html>- Here, the
text-align: center;style is applied to the<body>element, so it will cascade, or be inherited by each element inside<body>.
- Here, the
- We can factor out CSS into the
<head>, with CSS classes:<!DOCTYPE html> <html lang="en"> <head> <style> .centered { text-align: center; } .large { font-size: large; } .medium { font-size: medium; } .small { font-size: small; } </style> <title>css2</title> </head> <body class="centered"> <header class="large"> John Harvard </header> <main class="medium"> Welcome to my home page! </main> <footer class="small"> Copyright © John Harvard </footer> </body> </html>- Now, the HTML in the
<body>specifies aclassfor each element, but all the CSS for the styling has been moved to the<head>, so we can compartmentalize it more easily. And in CSS, we use.somethingto apply properties to elements with a class ofsomething. Each class, too, can have many CSS properties, not just one.
- Now, the HTML in the
- We could even apply CSS to all elements of a certain type, using CSS selectors:
<!DOCTYPE html> <html lang="en"> <head> <style> body { text-align: center; } header { font-size: large; } main { font-size: medium; } footer { font-size: small; } </style> <title>css3</title> </head> <body> <header> John Harvard </header> <main> Welcome to my home page! </main> <footer> Copyright © John Harvard </footer> </body> </html>- Notice that now we can use
bodyandheaderto select those elements, without attaching a class to them in the HTML.
- Notice that now we can use
- Finally, we can include external stylesheets, or CSS in separate files, that multiple HTML pages can include and share:
<!DOCTYPE html> <html lang="en"> <head> <link href="css4.css" rel="stylesheet"> <title>css4</title> </head> <body> <header> John Harvard </header> <main> Welcome to my home page! </main> <footer> Copyright © John Harvard </footer> </body> </html>- We need to create a file called
css4.css, and place our CSS code inside that, for this to work. But now we can use the<link>tag to include it. - There are tradeoffs, too, to having separated CSS files, since a simple webpage may not need the additional complexity and overhead of a linked stylesheet. But having separation of concerns allows for easier collaboration and clearer organization of code.
- We need to create a file called
- Phew, we covered lots of concepts here! But, now that we’re familiar with some of these patterns, we can learn to use additional features by reading examples and documentation online.
JavaScript
- JavaScript, a programming language, can be used on our webpages to make them more dynamic. The user’s browser runs the JavaScript code we write, to make changes to the page.
- JavaScript is similar to C, and is interpreted by a browser from top to bottom.
- Many of the programming elements are the same:
let counter = 0;- We use the
letkeyword in JavaScript to initialize a variable, and we don’t need to specify what the type of the variable will be.
- We use the
- Adding 1 to a variable has the exact same syntax as it does in C.
counter = counter + 1; counter += 1; counter++; - Conditions and loops, too, are the same.
if (x < y) { } else if { } else { } while (true) { } for (let i = 0; i < 50; i++) { } - Our example webpage can be represented by a tree, in what’s called the DOM, Document Object Model:
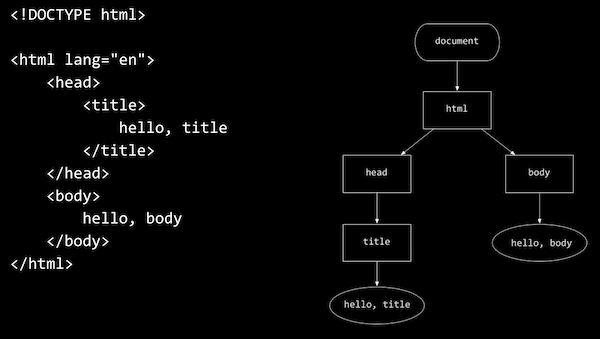
- Notice that each node is an element on the page, and nested nodes show as children nodes. A browser, when it loads a webpage, automatically builds a tree in memory with elements from the HTML.
- With JavaScript, we can add or change any of these nodes in the DOM.
- We can make an interactive page like the following:
<!DOCTYPE html> <html lang="en"> <head> <script> function greet() { alert('hello, ' + document.querySelector('#name').value); } </script> <title>hello1</title> </head> <body> <form onsubmit="greet(); return false;"> <input autocomplete="off" autofocus id="name" placeholder="Name" type="text"> <input type="submit"> </form> </body> </html>- We have a form element in the
<body>with a text input and a submit button. But when the form is submitted, we want our browser to call agreet()function, and withreturn false;, we tell the browser to do nothing else with the form. So we put that into theonsubmitattribute of the form. Notice that we also haveid="name"for the text input element. Theautocomplete="off"attribute turns off the autocomplete in the browser, andautofocusselects the input box when the page is loaded so the user can start typing into it right away. - The
greet()function is defined in the<head>of our page, inside a<script>tag that allows us to write our own JavaScript. In JavaScript, we can define a function with thefunctionkeyword, and if it takes no inputs, we can simply use(). And this function in turns calls thealert()function, which is built into browsers, to create an alert box. - The content of the alert box will be
hello,plus the value of the element in the webpage (calleddocument) with the IDname. ThequerySelectorfunction is attached to the object that represents the webpage, so we call it withdocument.querySelector(). Then, the element that gets selected will also has an attribute calledvaluethat we can access with.value.
- We have a form element in the
- We look at another example, that can change the style of a webpage:
<!DOCTYPE html> <html lang="en"> <head> <title>background</title> </head> <body> <button id="red">R</button> <button id="green">G</button> <button id="blue">B</button> <script> let body = document.querySelector('body'); document.querySelector('#red').onclick = function() { body.style.backgroundColor = 'red'; }; document.querySelector('#green').onclick = function() { body.style.backgroundColor = 'green'; }; document.querySelector('#blue').onclick = function() { body.style.backgroundColor = 'blue'; }; </script> </body> </html> - It turns out that we can attach JavaScript functions to events in the browser, like the following:
blurchangeclickdragfocuskeypressloadmousedownmouseovermouseupsubmittouchmoveunload...
- We can add code called event listeners to elements like
document.querySelector('#red'). Theonclickvalue of each element can be a function that is automatically called by the browser, when the element is clicked. And the function attached doesn’t have a name, but is defined withfunction() {}. - With
body.style.backgroundColor, we can access thestyleof thebody, and set itsbackgroundColorvalue. - We can change the font size, too:
<!DOCTYPE html> <html lang="en"> <head> <title>size</title> </head> <body> <p> Lorem ipsum dolor sit amet, consectetur adipiscing elit. Nullam in tincidunt augue. Duis imperdiet, justo ac iaculis rhoncus, erat elit dignissim mi, eu interdum velit sapien nec risus. Praesent ullamcorper nibh at volutpat aliquam. Nam sed aliquam risus. Nulla rutrum nunc augue, in varius lacus commodo in. Ut tincidunt nisi a convallis consequat. Fusce sed pulvinar nulla. </p> <select> <option value="xx-large">xx-large</option> <option value="x-large">x-large</option> <option value="large">large</option> <option selected value="initial">initial</option> <option value="small">small</option> <option value="x-small">x-small</option> <option value="xx-small">xx-small</option> </select> <script> document.querySelector('select').onchange = function() { document.querySelector('body').style.fontSize = this.value; }; </script> </body> </html>- We have a set of
optionelements in aselect(a dropdown menu in HTML that we can look up the documentation for) and now, whenever theselectelement is changed, we set thefontSizeof thestyleof thebodyelement. We set that value tothis.value, andthisrefers to theselectelement when the function is called, since the function is called from that element.
- We have a set of
- We can write a page with an element that blinks, or appears and disappears repeatedly:
<!DOCTYPE html> <html lang="en"> <head> <script> // Toggles visibility of greeting function blink() { let body = document.querySelector('body'); if (body.style.visibility == 'hidden') { body.style.visibility = 'visible'; } else { body.style.visibility = 'hidden'; } } // Blink every 500ms window.setInterval(blink, 500); </script> <title>blink</title> </head> <body> hello, world </body> </html>- We use the
visibilityattribute to make thebodyvisible or hidden, andwindow.setIntervalto call this function every 500 milliseconds.
- We use the
- Browsers also have a geolocation function, which we can call to get the user’s current location:
<!DOCTYPE html> <html lang="en"> <head> <title>geolocation</title> </head> <body> <script> navigator.geolocation.getCurrentPosition(function(position) { document.write(position.coords.latitude + ", " + position.coords.longitude); }); </script> </body> </html>navigatorrefers to the user’s browser, and thegeolocation.getCurrentPositionfunction will return apositionobject. When we get thatpositionobject, we want to call a function that will then write thelatitudeandlongitudevalues to the document.